

Tiling & Alignment: How to Split Large Graphics Without “Cutting Faces in Half”


You often have a problem when you split big graphics for printing or showing. If you cut through a face or an important part, it can make the picture look bad. You can plan ahead to keep the tile lines away from the main parts. Looking at the picture first helps you get a better final look.
Tip: Look at your graphic and mark the important spots before you start tiling & alignment: how to split large graphics without “cutting faces in half”.
Key Takeaways
-
Plan where tiles will go so you do not cut faces or logos. Use guides and grids to see your layout. Keep seams away from important things. Mark key visual parts before you start tiling. This helps protect them when you split the graphic. Look at your tiled layout before you print it. This helps you find problems with alignment. Make safe zones around faces, logos, and text. This keeps them clear and whole. Change tile sizes or move boundaries if seams might cut important parts. Add overlap and bleed to help line up tiles. This stops gaps when you install them. You can use seam-aware production services for expert help. This helps you get a professional look.
What is Tiling & Why It Matters
Tiling in Graphic Production
Tiling is a method you use to split large graphics into smaller sections, called tiles. This process helps you print or display images that are bigger than your printer or material. You can choose different ways to divide your graphic. Some people use equal-sized tiles by setting the number of columns and rows. Others pick a specific size for each tile, making sure every piece fits together. Sometimes, you use a “one size fits all” approach, where every tile has the same dimensions. The table below shows how tiling works in graphic production:
|
Method |
Description |
|---|---|
|
Equal Size Tiles |
You set the number of columns and rows. Each tile is the same size. |
|
Specific Size Tiles |
You choose the width and height. Tiles are made as close to that size as possible. |
|
One Size Fits All |
Every tile has the same dimension, no matter how many tiles you need. |
Tiling & Alignment: How to Split Large Graphics Without “Cutting Faces in Half” helps you avoid problems when you work with oversized graphics. You need to plan how you split your image so every tile lines up perfectly.










Alignment Issues
When you tile a graphic, you can face alignment problems. Vinyl can stretch during installation, which makes tiles not match up. Sometimes, one side of your graphic ends up longer than the other after tiling. If you do not set your printing software correctly, you might see gaps or overlaps. You can fix some issues by adjusting the tension on the take-up roll or installing tiles from the middle outwards. Here are common alignment issues you might see:
-
Vinyl stretches or shrinks during installation.
-
Panel lengths do not match after tiling.
-
Printing software settings cause misalignment.
-
Tiles do not connect perfectly at the edges.
You need to check your setup and use good techniques to keep your tiles aligned.
Impact of Poor Splits
Disrupted Faces
If you split a graphic without planning, you might cut through a face. This mistake can ruin the look of your image. Even a small misalignment can make a face look strange or broken. You want every face to appear whole and natural.
Broken Focal Points
Poor splits can also break up logos, text, or other important features. When a focal point sits on a seam, it loses its impact. You need every edge to connect perfectly for a professional result. Tiling & Alignment: How to Split Large Graphics Without “Cutting Faces in Half” helps you keep your main features safe and your graphic looking seamless.
Tip: Always preview your tiled layout before printing. This step helps you spot any faces or focal points that might get cut.
Planning Tile Boundaries with Composition

When you work with large graphics, planning your tile boundaries is the key to a seamless look. You want to avoid cutting through faces, logos, or important text. Careful composition helps you keep every feature whole and clear.
Analyzing Key Visual Elements
Start by looking at your graphic closely. Find the faces, logos, and text that stand out. These are your key visual elements. Mark them on your design. You want to make sure no tile seam runs through these spots. If you split a face or logo, the final image will look broken.
Tip: Use sticky notes or digital markers to highlight faces and focal points before you begin tiling.
You can use a simple checklist to help you spot important features:
-
Faces or people in the image
-
Company logos or branding
-
Large text or headlines
-
Main objects or focal points
If you identify these elements early, you can plan your tile boundaries to protect them.
Using Guides & Grids
Guides and grids help you plan where each tile will go. You can draw your layout on grid paper or use digital tools. This step lets you see how tiles fit together and where seams will fall.
By creating a grid for your graphic, you can visualize the arrangement and avoid placing seams through important features. Drawing to scale gives you a clear idea of how your tiles will look in the real world. You can adjust your grid to move seams away from faces, logos, or text.
-
Visualize your graphic on grid paper.
-
Draw to scale for precise planning.
-
Adjust the grid to avoid obstacles like faces or logos.
Careful planning with guides and grids also helps you avoid tricky cuts around features like vents or fixtures. You can shift your layout so these features do not fall within a single tile, making installation easier.
Adjusting Tile Layouts
Sometimes, your first plan does not work perfectly. You may need to adjust your tile layout to keep your graphic looking its best. There are two main ways to do this: shifting boundaries and resizing tiles.
Shifting Boundaries
You can move tile boundaries to avoid cutting through key features. If a seam runs close to a face or logo, shift it a few inches to the left or right. This small change can make a big difference in the final look.
-
Center your tile layout to keep cuts balanced.
-
Move seams away from faces, logos, or text.
-
Place cut tiles at the edges for a clean appearance.
Resizing Tiles
If shifting boundaries does not solve the problem, you can resize your tiles. Make some tiles larger or smaller to keep important features whole. Try to avoid making tiles smaller than half their original size. Small tiles can look messy and make installation harder.
-
Minimize small cuts.
-
Keep most tiles the same size for a neat look.
-
Adjust tile sizes only when needed to protect key features.
How Planning Reduces Visual Disruptions
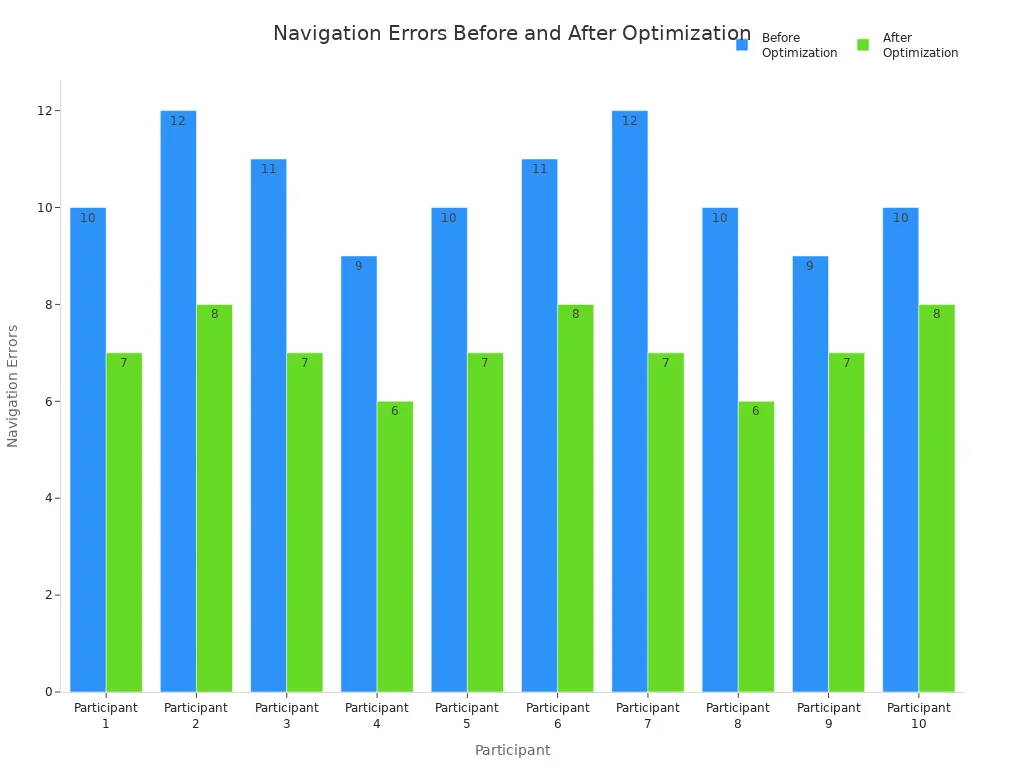
Planning tile boundaries with composition helps you avoid mistakes. You can see the difference in the table below. It shows how navigation errors dropped after optimizing tile boundaries.
|
Participant |
Navigation Errors Before Optimization |
Navigation Errors After Optimization |
|---|---|---|
|
1 |
10 |
7 |
|
2 |
12 |
8 |
|
3 |
11 |
7 |
|
4 |
9 |
6 |
|
5 |
10 |
7 |
|
6 |
11 |
8 |
|
7 |
12 |
7 |
|
8 |
10 |
6 |
|
9 |
9 |
7 |
|
10 |
10 |
8 |
You can also see the improvement in the chart below. Planning tile boundaries helps you reduce errors and keep your graphic looking sharp.
Tiling & Alignment: How to Split Large Graphics Without “Cutting Faces in Half” gives you the tools to plan ahead. You can use guides, grids, and smart adjustments to protect every face, logo, and word in your design.
Safe Zones for Faces, Logos, and Text
When you work with large graphics, you want every face, logo, and word to look clear and complete. Safe zones help you protect these important features from getting split by seams. A safe zone is an area inside your design where you place key elements so they do not get cut or covered during tiling.
Creating Buffer Areas
You can create buffer areas by marking a space around faces, logos, and text. This space acts like a shield. It keeps seams and tile edges away from the main features. You should always check your design and draw a green overlay to show the safe zone. For example, a safe zone might measure 1214 x 830px. Place the head of a key character, the company logo, or the main title inside this area.
Tip: Use a colored overlay to mark your safe zone. This helps you see where to place important elements and avoid mistakes.
Here are steps you can follow to set up buffer areas:
-
Identify faces, logos, and text that must stay whole.
-
Draw a safe zone around each feature.
-
Keep tile seams outside the safe zone.
-
Adjust your layout if a seam gets too close.
You can use software tools to add guides and overlays. This makes it easier to see buffer areas and plan your tiling.
Protecting Key Features
You need to protect faces, logos, and text from seams. If a seam runs through a face or logo, it can ruin the look of your graphic. You can use safe zones and buffer areas to keep these features safe.
Avoiding Seams Through Faces
Always keep the head of a key character inside the safe zone. This prevents cropping or splitting. If you see a seam near a face, move the boundary or resize the tile. You want every face to look natural and complete.
-
Place faces inside the green safe zone.
-
Check your layout before printing.
-
Move seams away from faces if needed.
Preserving Text & Logos
Text and logos need extra care. You should place them inside the safe zone so they do not get cut or covered. Make sure the focal point of your background image also sits inside the safe zone. This keeps your message clear and your branding strong.
|
Feature |
Safe Zone Placement |
Result |
|---|---|---|
|
Face |
Inside safe zone |
No cropping or split |
|
Logo |
Inside safe zone |
Branding stays clear |
|
Text |
Inside safe zone |
Message is readable |
Note: Always preview your design with safe zones marked. This step helps you catch problems before you print or install.
Tiling & Alignment: How to Split Large Graphics Without “Cutting Faces in Half” gives you the tools to use safe zones and buffer areas. You can protect every face, logo, and word in your design by planning ahead and using overlays.
Handling Stripes, Lines, and Patterns
When you use large graphics, stripes and patterns can be tricky. If you do not plan, lines might not match at the seams. You want every pattern to look smooth from one tile to the next. This part will show you how to keep your patterns looking neat and professional.
Seamless Transitions
You can make smooth transitions by planning your design and picking good materials. Patterns and stripes need extra care because even a small move can break the look. Here are some ways to help:
-
Use colors that are close in shade for smooth tile changes.
-
Mix bold patterns with simple tiles so it is not too busy.
-
Add borders or trim to mark where tiles meet and give structure.
-
Make sure all tiles are the same thickness so lines stay straight.
-
Match finishes so all tiles look like they belong together.
-
Think about what each area will be used for when picking patterns.
-
Pick classic styles if you want to change things later.
-
Test samples in real light to see if colors and patterns match.
Tip: Always look at your pattern samples in the real space before you finish. Light can change how colors and lines look.
Aligning Patterns Across Tiles
You want your patterns to match up at every seam. If you use the right way, lines and stripes will stay together across all tiles.
Matching Stripes
How you line up patterns is very important. The Tiled Diffusion method helps keep patterns and stripes flowing from one tile to the next. This way, the design looks strong and smooth, and you will not see broken lines at the seams. Other ways, like STI, can leave gaps or lines that do not match, so pick a method that keeps patterns lined up for big graphics.
Note: Always use a method that keeps patterns together, especially for hard or repeating designs.
Previewing Alignment
Before you print or put up your tiles, check how the patterns will line up. This step helps you find mistakes early and fix them. You can try these steps:
-
Lay your stack of patterns with the original paper on the bottom, the new paper in the middle, and muslin on top.
-
Use parchment paper to trace changes and move marks between layers.
-
Make changes by looking through the parchment paper.
These steps help you see how stripes and lines will join across tiles. You can fix problems before you print or install.
Tip: Take your time when checking. A careful look now can stop big mistakes later.
If you follow these steps, you can work with stripes, lines, and patterns easily. Your big graphics will look smooth, and every stripe will line up just right.
Tiling Guide & Seam-Safe Grid Method
You can break big graphics into tiles and keep every face, logo, and pattern whole. This guide will show you how to use the seam-safe grid method for good alignment. You will learn each step, see which software tools help, and find out how to check your work before you print.
Step-by-Step Tiling Workflow
Follow these steps to tile your graphic and avoid cutting through important features:
-
Mark Key Features
First, look at your graphic. Find faces, logos, and text. Mark these spots so you know where not to put seams. -
Set Up a Seam-Safe Grid
Draw a grid on your design. Make sure no seam goes through a face or logo. Move the grid until all key features are inside safe zones. -
Define Tile Boundaries
Use guides to show where each tile starts and ends. Keep boundaries away from important parts. -
Check Alignment
Use alignment tools to make sure all tiles line up. Look for straight lines and matching edges. -
Preview the Tiled Layout
Before you print, preview your design. Check for any faces, logos, or text near seams. Make changes if you need to. -
Export Tiles for Printing
Save each tile as its own file. Give each file a clear name so you know where it goes.
Tip: Always preview your tiled layout before printing. This step helps you catch mistakes early.
The seam-safe grid method helps you make fewer alignment errors. Numbers like SSIM (0.9526) and PSNR (26.7321) show this method is very accurate and has low error rates.
Using Software Tools
You can use many software tools to help with tiling and alignment. These tools make your work faster and more correct.
|
Key Features |
|
|---|---|
|
GISBox |
Supports many terrain data types, fast tile making, easy to use. |
|
Cesium ion |
Makes tiles automatically, works in the cloud, streams images well. |
|
Global Mapper |
Handles many terrain types, strong analysis tools, LOD rendering. |
|
TileMill |
Open-source, custom rendering, web map service output. |
|
MapTiler |
Works with Cesium Terrain, local and cloud publishing, easy to use. |
-
Griffin: Gives automatic tiling and layout control, drag-and-drop, and presets for repeated work, making things easier.
Photoshop Techniques
Photoshop gives you tools to check and change your tiles. Use Pattern Preview to see your design as it repeats. You can move faces, logos, or text away from seams right away. This tool helps you check alignment and fix things before you print.
Note: Pattern Preview lets you see your design tiled right away. You can fix problems with faces or patterns quickly.
Illustrator & Inkscape
Illustrator and Inkscape help you set up grids and guides. You can draw tile boundaries and move key features into safe zones. Both programs let you snap objects to guides, making alignment simple. You can save each tile as its own file for printing.
-
Use the grid tool to make your seam-safe grid.
-
Snap faces, logos, and text into safe zones.
-
Save tiles with clear names for easy assembly.
Preview & Test Tiles
Previewing and testing your tiles is the last step before you print. You want to make sure every seam lines up and no face or logo gets cut.
|
Key Features |
Best Use Case |
|
|---|---|---|
|
Ditsy Pixel Seamless Pattern Checker |
Drag-and-drop upload, Instant tiled preview, Clean interface |
Quick seam checks and fast pattern validation |
|
PatternChecker.net |
Adjustable repeat grid, Horizontal and vertical tiling controls |
Patterns that need repeat changes |
|
Patterned.ai Seamless Checker |
Seamless preview for AI patterns, Fast tiling check |
Checking AI pattern tiles |
|
Seamless Texture Checker (PyCheung) |
Drag-and-drop upload, Background color control |
Subtle textures and transparent patterns |
|
BardotBrush Repeating Pattern Tester |
Simple repeat preview, Artist-friendly workflow |
Quick previews for digital artists |
-
Use guides to mark each tile boundary clearly.
-
Use alignment tools to make sure all tiles fit together for a smooth look.
-
Preview the tiled design before you print to see if you need to fix anything.
You can drag and drop your design into these tools. See how your tiles look together. Fix any problems before you print. Tiling & Alignment: How to Split Large Graphics Without “Cutting Faces in Half” is easy when you use these preview tools.
Tip: Always test your tiles with a preview tool. You will find mistakes before they become big problems.
Pro Tips & Seam-Aware Services
Overlap & Bleed
When you split large graphics into tiles, you need to think about overlap and bleed. These extra spaces help you line up each tile perfectly and prevent gaps or white lines from showing. Overlap means you add a small area where two tiles cover each other. Bleed is the extra image area that goes beyond the cut line. Both help you get a seamless look.
-
Keep enough margin between each tile to stop light bleeding and unwanted marks.
-
Check for overlaps using your design software’s preview tools or special modes like UV Overlap draw mode.
-
Space out your tiles so they do not touch or overlap in the wrong places. This stops visual artifacts and keeps your graphic clean.
Tip: Always add a little extra image area (bleed) around each tile. This gives you room to trim and line up the tiles during installation.
Registration Marks
Registration marks help you line up each tile during printing and installation. These marks are small shapes or lines you add to the edges of your tiles. When you put the tiles together, you match up the marks to keep everything straight.
You can use circles, crosses, or triangles as registration marks. Place them in the same spot on each tile. Make sure they are easy to see but outside the main design area. After you finish installing, you can trim or cover the marks.
|
Registration Mark |
Use Case |
Placement |
|---|---|---|
|
Circle |
General tiling |
Corners/edges |
|
Cross |
Pattern matching |
Tile borders |
|
Triangle |
Directional help |
Top/bottom edges |
Note: Always check that your registration marks do not cover faces, logos, or text.
Common Mistakes
You can avoid many problems by planning ahead and checking your work. Some mistakes happen often when people tile large graphics.
Overlapping Errors
If you do not keep enough space between tiles, you might see unwanted lines or color changes. Tiles that overlap too much can cause double images or dark spots. Tiles that do not overlap enough can leave gaps. Always keep a steady margin and check your layout before printing.
Missed Previews
Skipping the preview step is a common mistake. If you do not preview your tiled layout, you might miss faces or logos that get cut by seams. You might also miss pattern mismatches or alignment problems. Always use preview tools to see how your tiles fit together before you print.
Tip: Take time to check your surface and materials before you start. A clean, smooth, and level surface helps your tiles stick well and look great.
You can avoid most tiling problems by following these tips and using the right tools. Careful planning and checking help you get a professional result every time.
Seam-Aware Production Service
When you use large graphics, you want every face, logo, and pattern to look great. Sometimes, tiling and alignment can be hard, especially with tricky designs or strange surfaces. Seam-aware production services help you fix these problems. These services use special tools and smart planning so your tiles fit together without cutting important features.
You can get help from a seam-aware production service when you need it. These experts look at your graphic and find the best way to split it. They use software to make safe zones for faces, logos, and text. You get a layout that keeps seams away from key features. This makes your final graphic look smooth and professional.
Tip: Seam-aware services are good for murals, wall wraps, trade show displays, and any project where alignment is important.
Here is what a seam-aware production service can do for you:
-
Check your graphic for faces, logos, and text.
-
Plan tile boundaries so you do not cut important features.
-
Add overlap and bleed to make installation easy.
-
Put registration marks for perfect alignment.
-
Preview the tiled layout before printing.
-
Change tile sizes and boundaries for the best look.
You can see the benefits in the table below:
|
Feature |
Standard Tiling |
Seam-Aware Service |
|---|---|---|
|
Face Protection |
Sometimes |
Always |
|
Logo Alignment |
May vary |
Consistent |
|
Pattern Matching |
Can be tricky |
Seamless |
|
Overlap & Bleed |
Manual setup |
Expert planning |
|
Registration Marks |
Optional |
Included |
|
Preview & Adjustments |
Limited |
Full support |
You get to pick where seams go. Seam-aware services listen to you and help you choose the best layout. You can ask for more overlap or special safe zones. The team works with you to make sure every tile matches your idea.
Note: If you have questions about overlap or seam placement, ask your production service. They can help you and show examples.
Seam-aware production services save you time and help you make fewer mistakes. You get expert advice, smart planning, and a preview of your final design. This helps you avoid problems like broken faces or patterns that do not line up.
Want your next project to look perfect? Try a seam-aware production service for your large graphics. You will see the difference in every tile.
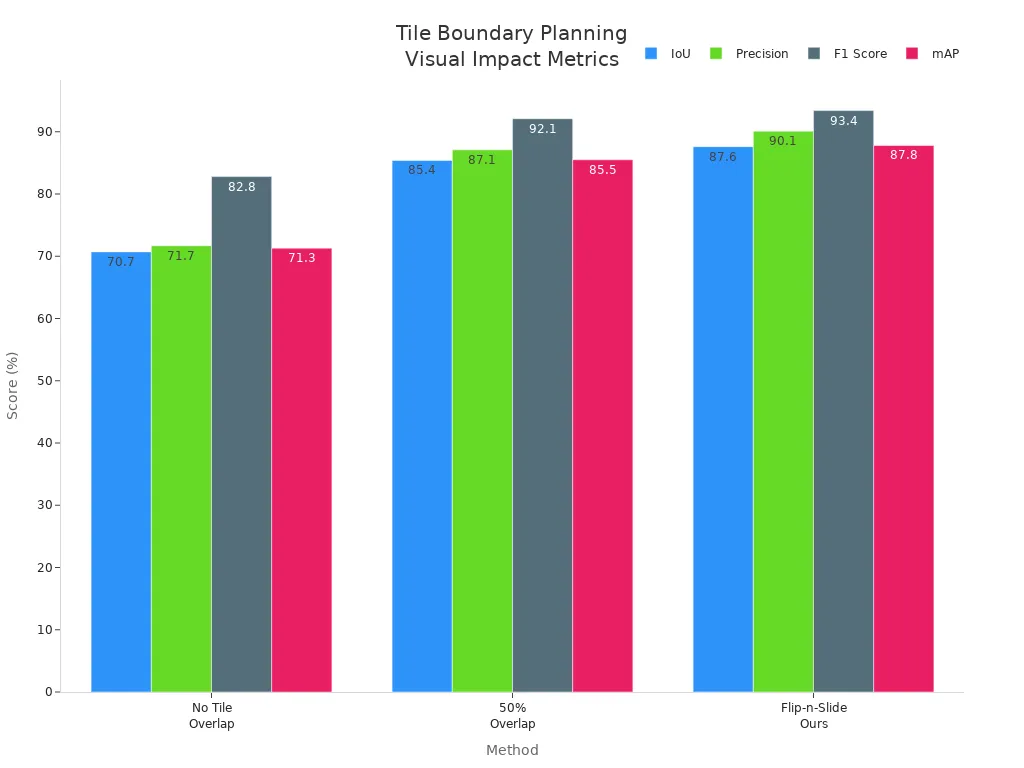
You improve your results when you plan tile boundaries. Guides, grids, and software tools help you keep faces and key features whole. The table below shows how better planning increases precision and F1 Score.
|
Method |
IoU |
Precision |
F1 Score |
|---|---|---|---|
|
No Tile Overlap |
70.7% |
71.7% |
82.8% |
|
50% Overlap |
85.4% |
87.1% |
92.1% |
|
Flip-n-Slide Ours |
87.6% |
90.1% |
93.4% |
Follow these steps before final production:
-
Preview your layout.
-
Test for alignment.
-
Adjust tile boundaries.
-
Check for safe zones.
-
Use seam-aware production services for best results.
Tiling & Alignment: How to Split Large Graphics Without “Cutting Faces in Half” helps you create seamless graphics every time.
FAQ
How much overlap should I use between tiles?
You should use an overlap of 0.25 to 0.5 inches (6–12 mm) for most large graphics. This extra space helps you line up tiles and prevents gaps. Always check your printer’s guidelines for the best results.
Who decides where the seams go?
You usually decide where to place seams. You can plan seam locations during the design stage. If you use a seam-aware production service, experts can help you choose the best spots to avoid faces, logos, and text.
What is a safe zone in tiling?
A safe zone is an area you mark around faces, logos, or text. You keep seams and cuts outside this area. This protects important features and keeps your graphic looking clean and professional.
Why do I need registration marks?
Registration marks help you line up each tile during installation. You match these marks to keep your design straight. You can use circles, crosses, or triangles as registration marks.
Can I adjust tile sizes to fit my design?
Yes, you can adjust tile sizes. You can make some tiles larger or smaller to avoid cutting through faces or logos. Try to keep most tiles similar in size for a neat look.
What tools help me preview my tiled layout?
You can use tools like PatternChecker.net, Ditsy Pixel Seamless Pattern Checker, or Photoshop’s Pattern Preview. These tools let you see how your tiles fit together before you print.
How do I keep patterns and stripes aligned across tiles?
You should use guides and grids to plan your layout. Always preview your design before printing. Move seams so stripes and patterns match up at the edges.
What should I do if a seam falls on a face or logo?
You should move the seam or adjust the tile size. Always check your layout before printing. Protect faces, logos, and text by keeping seams outside the safe zones.


